
See more before + afters and fun DIY projects in my weekly emails!
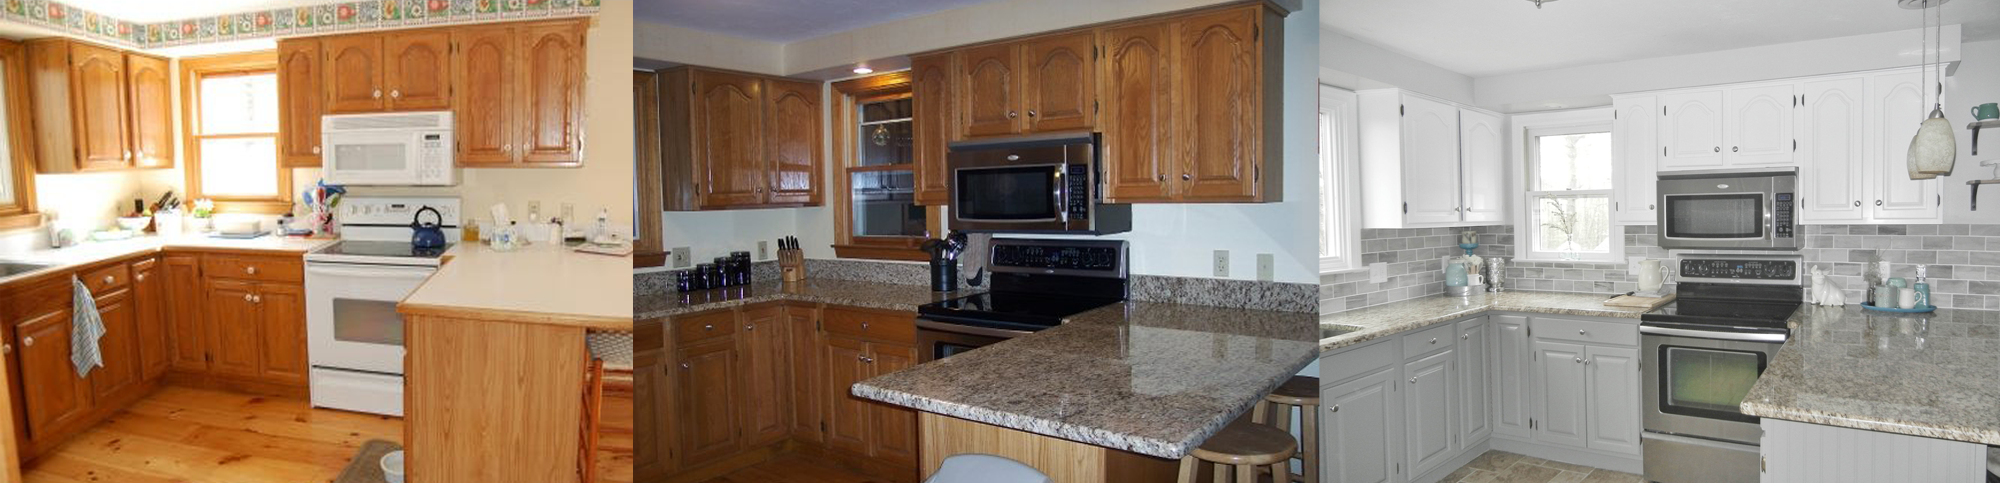
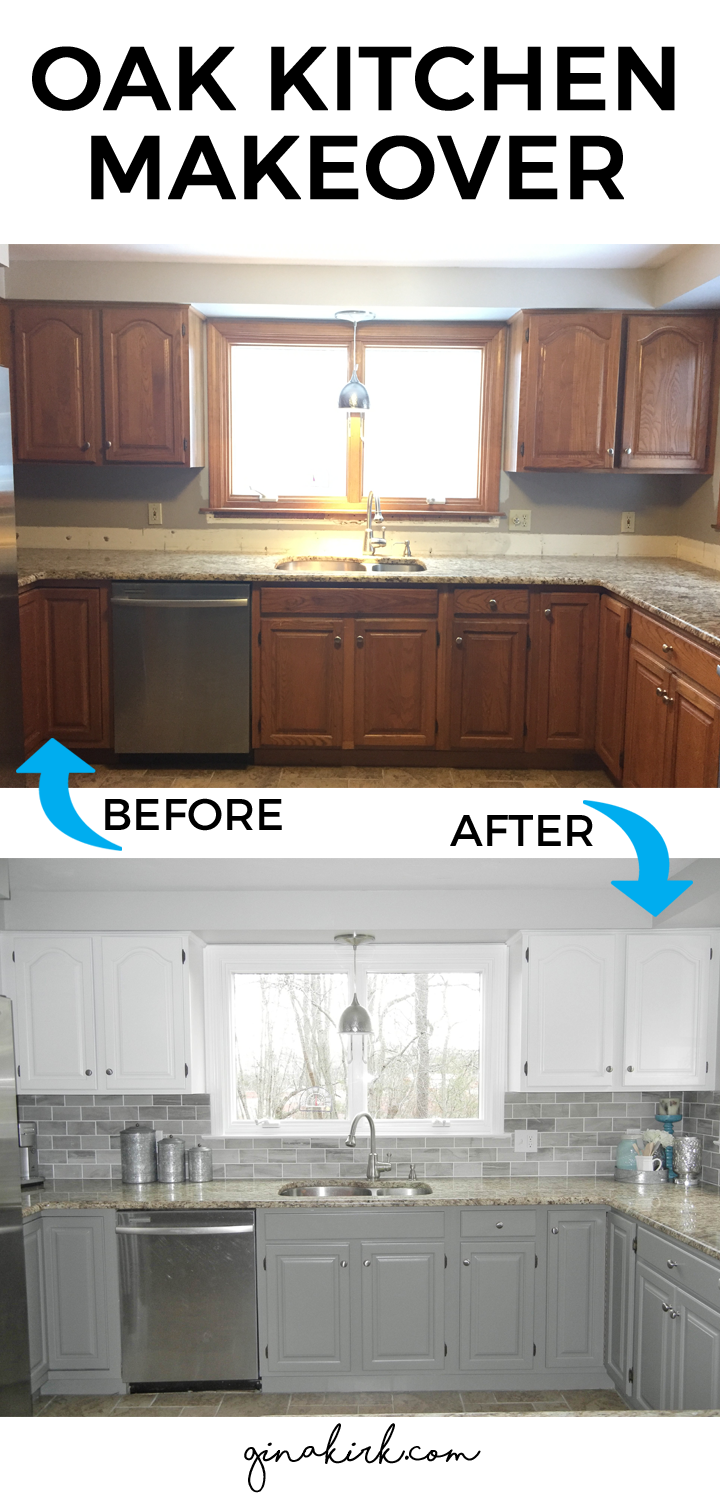
This has been a looooong time coming. I suppose that my current obsession with Fixer Upper may have lit a match under me to get rolling on our kitchen project. When we moved in, our entire house was 80’s – like, major 80’s. Here are the realtor photos from before we moved in in 2008:
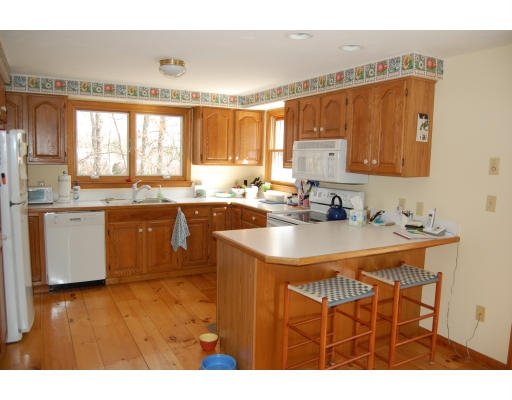

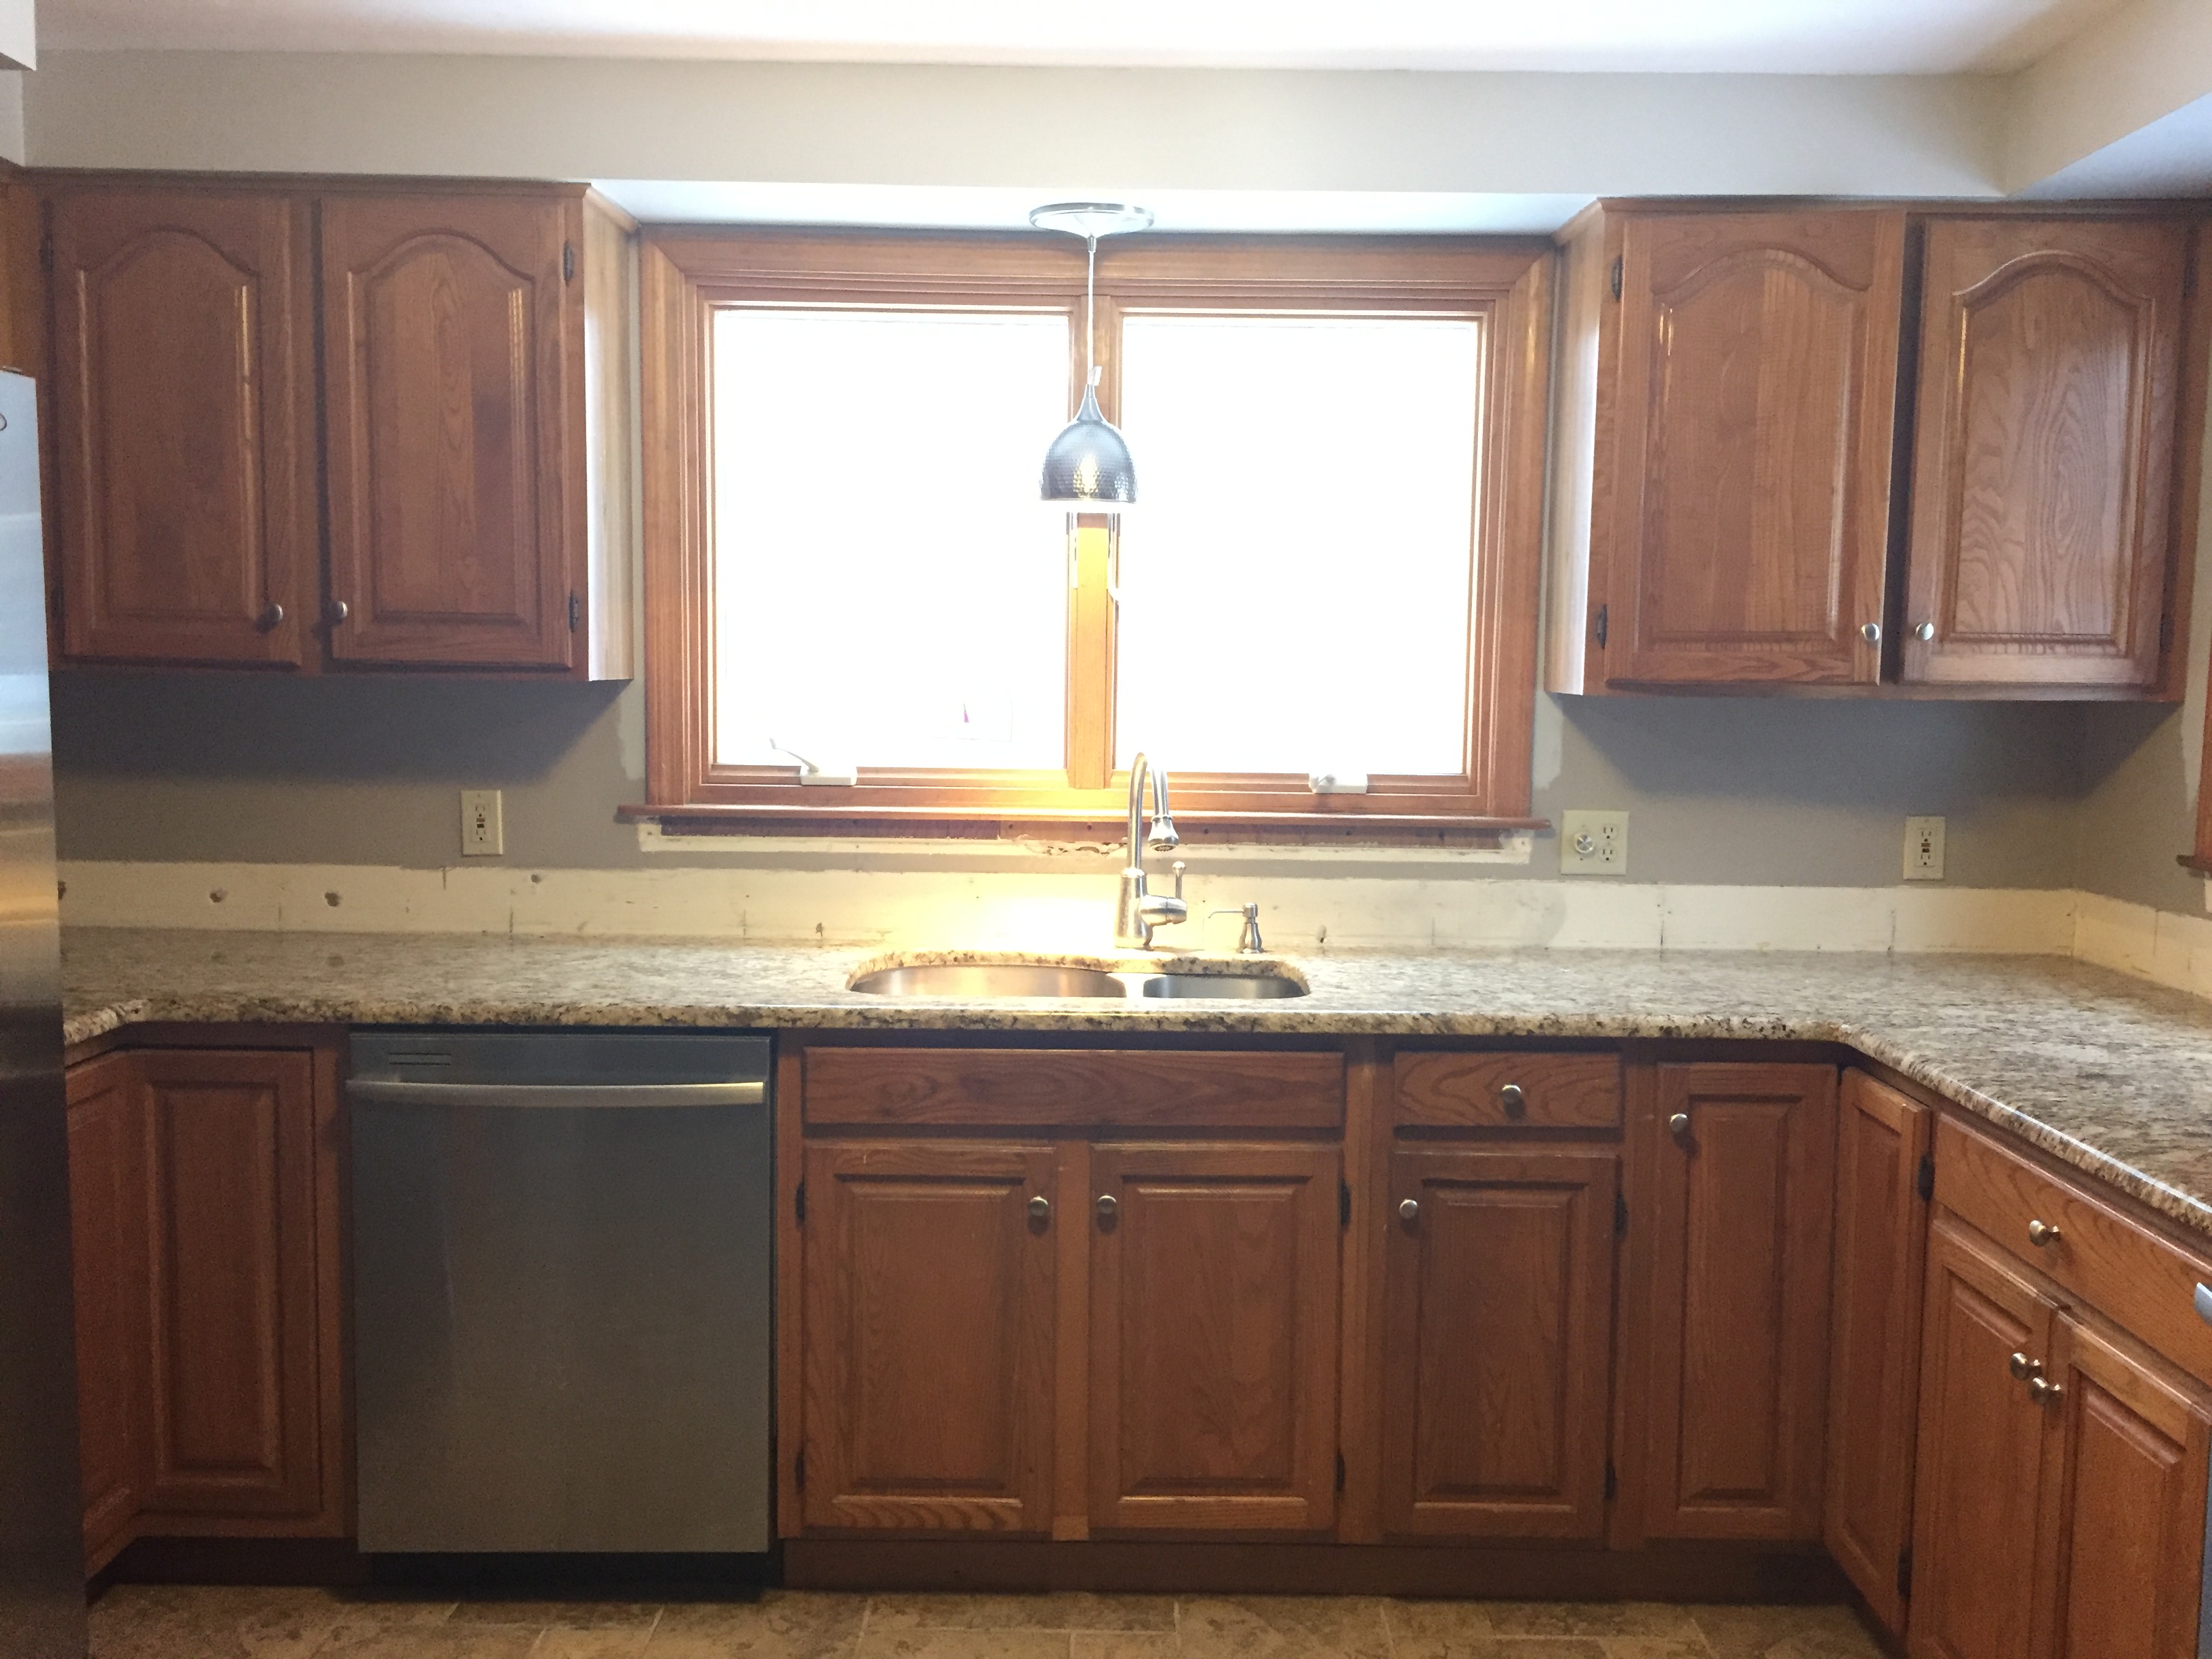
Yeah… 80’s. We decided to tackle a few things at a time, and our kitchen looked like this not long after moving in (disregard the terrible photography, this was ’08 people):
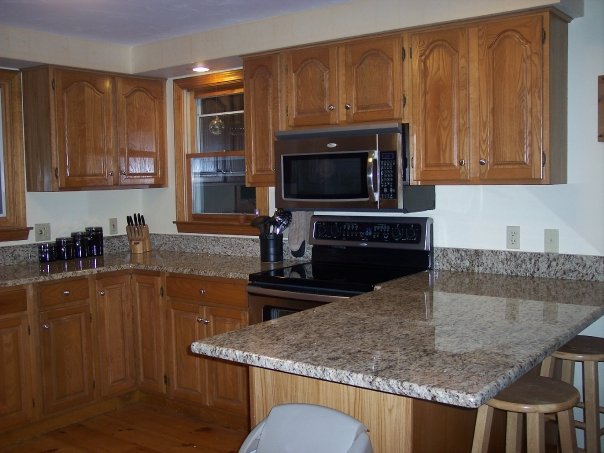
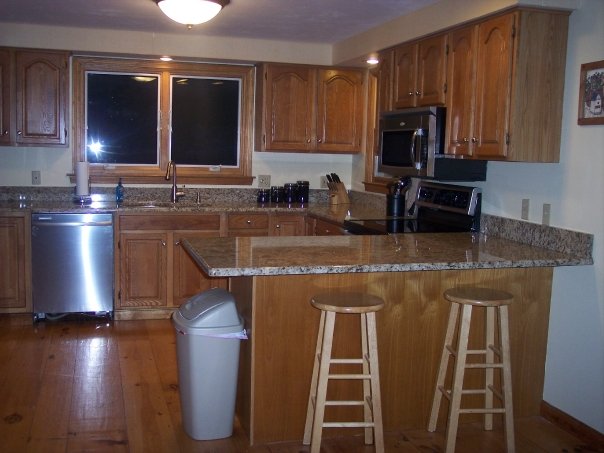
We lived with this for a while, then I decided I was on oak/pine/wood grain overload.. so Mr. Kirk ripped out the wide pine planked flooring in the kitchen (don’t panic, we still have it throughout the entire house, so I was ok with this.) I had fully intended to great before photos this time, however, Mr. Kirk decided he would rip off the backsplash and get started adding the beadboard before I had a chance to do so. So here’s our freshly-prepped-for-reno-kitchen:
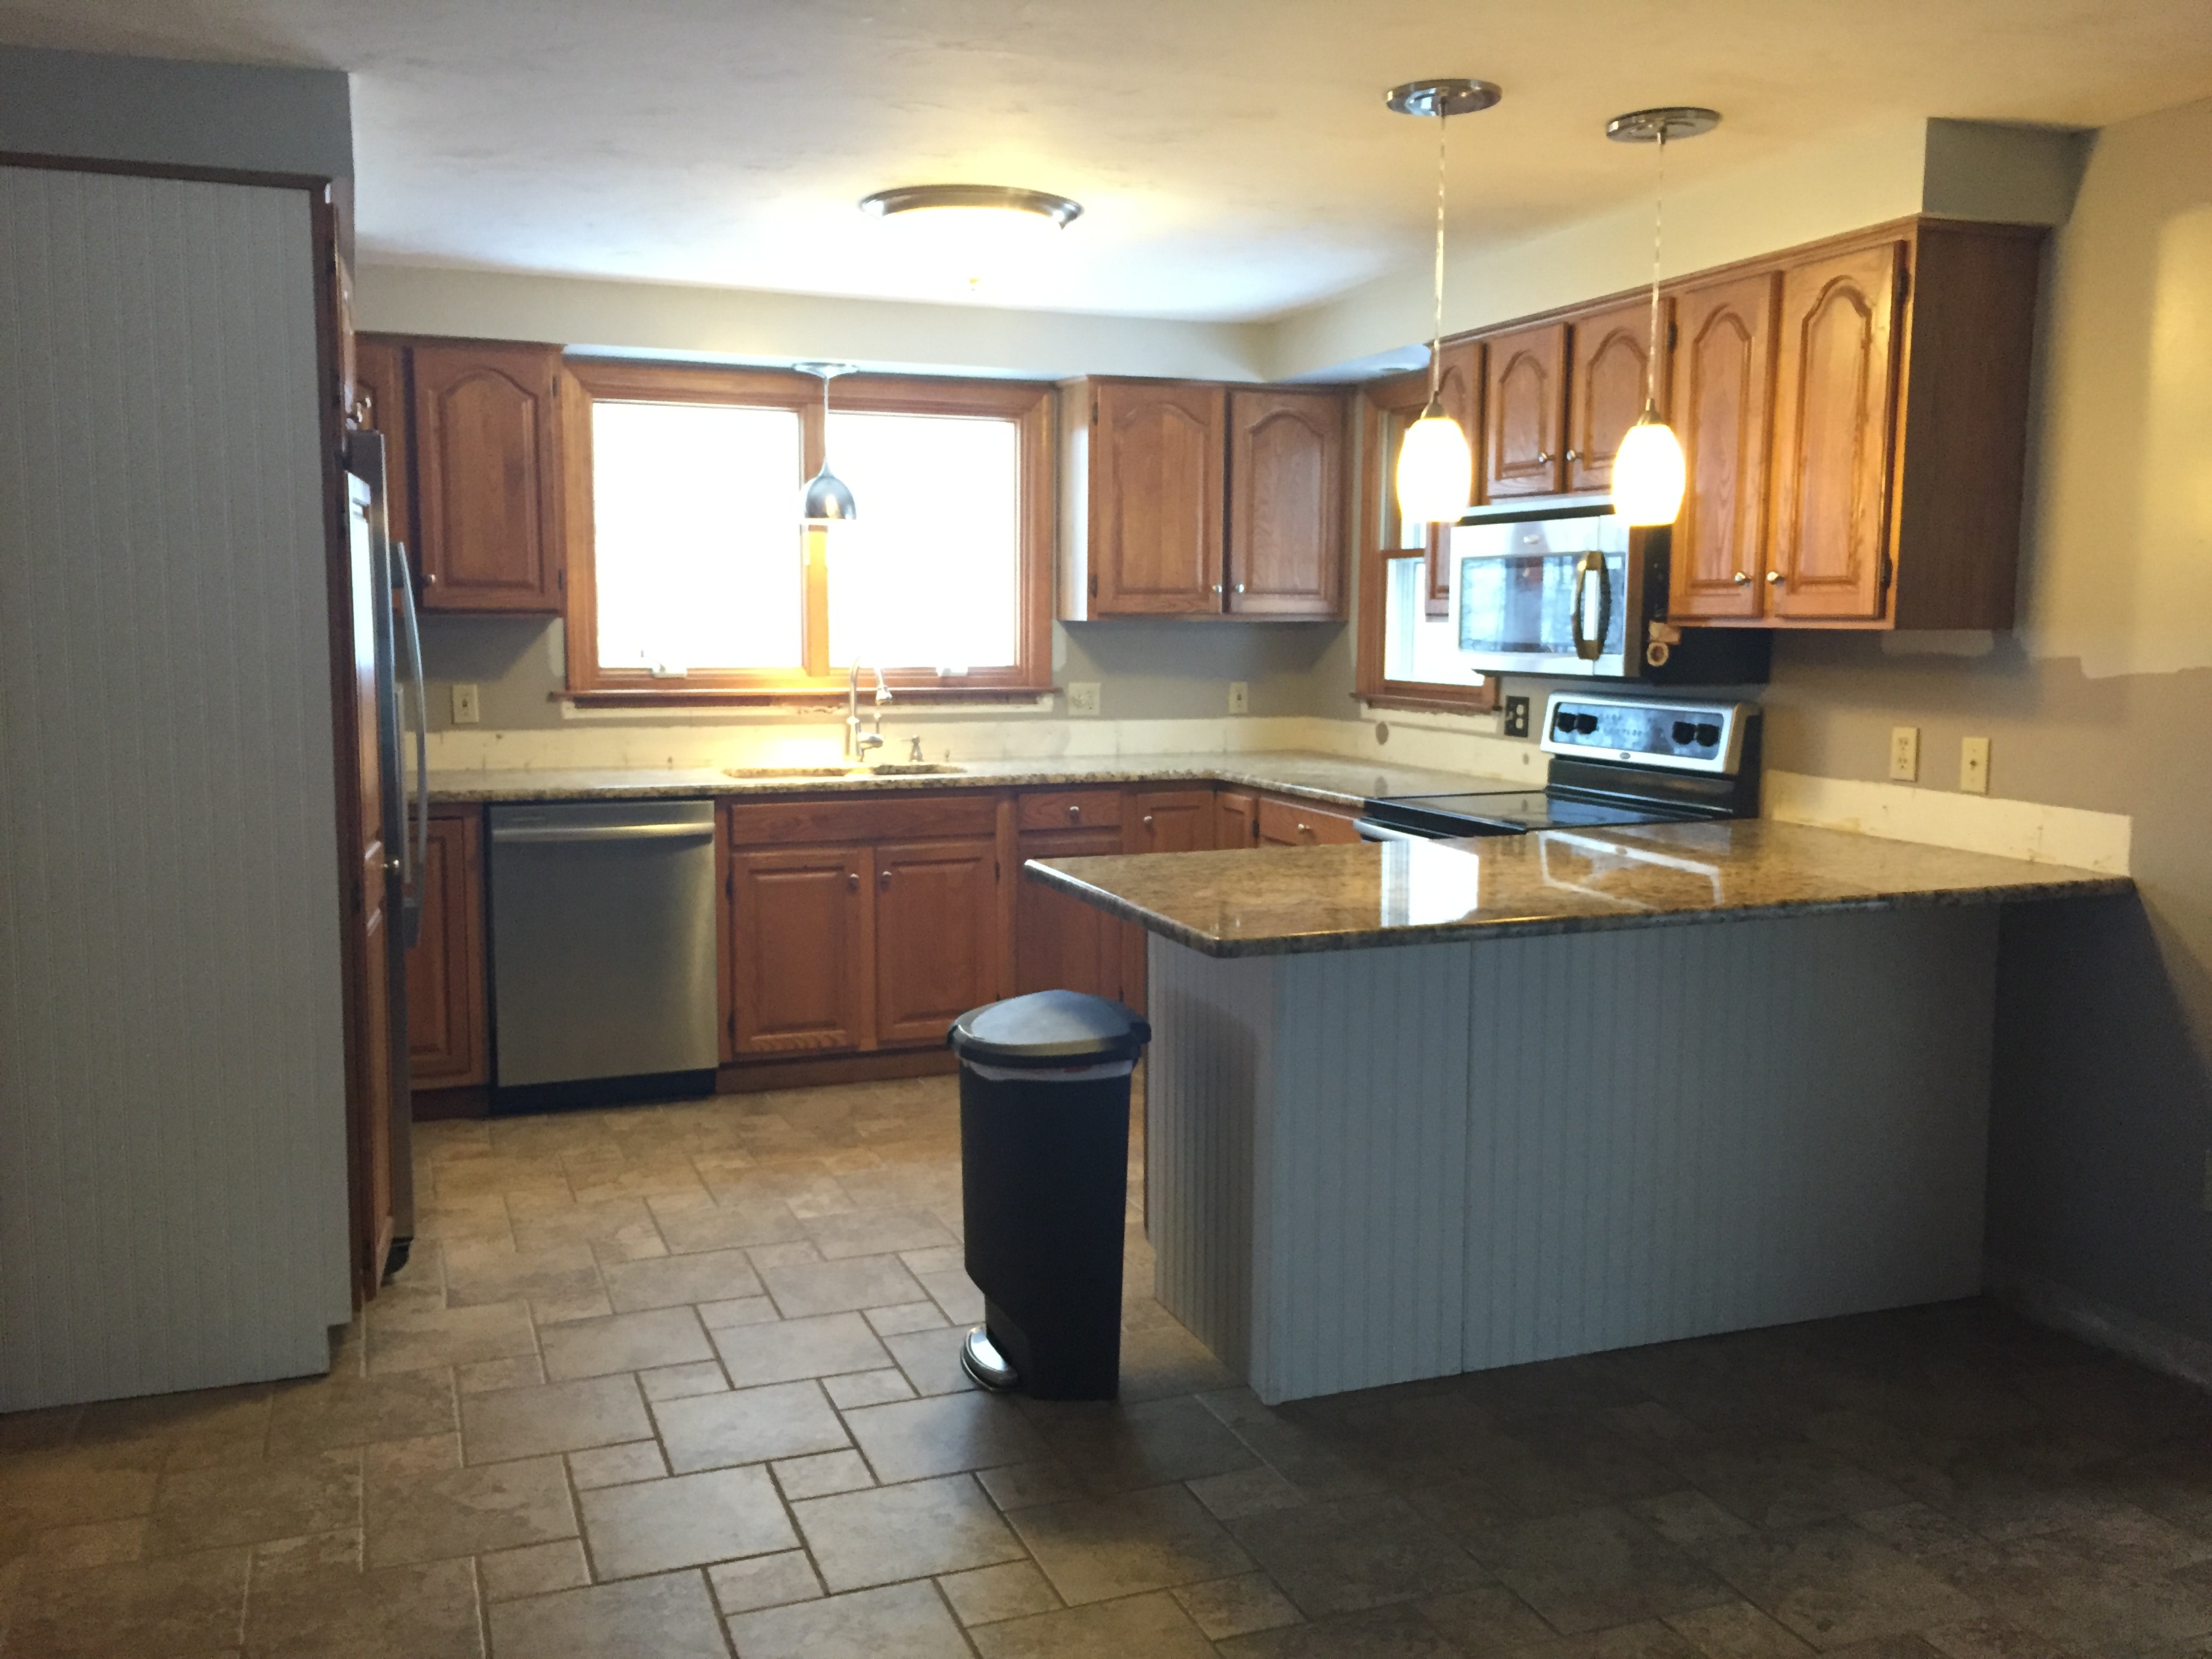
Here, you’ll see he already installed my new light over the sink. We had a simple recessed light there before:
The after photos are the most important ones anyway, right?
Before I get to those… Here is what we decided to do.
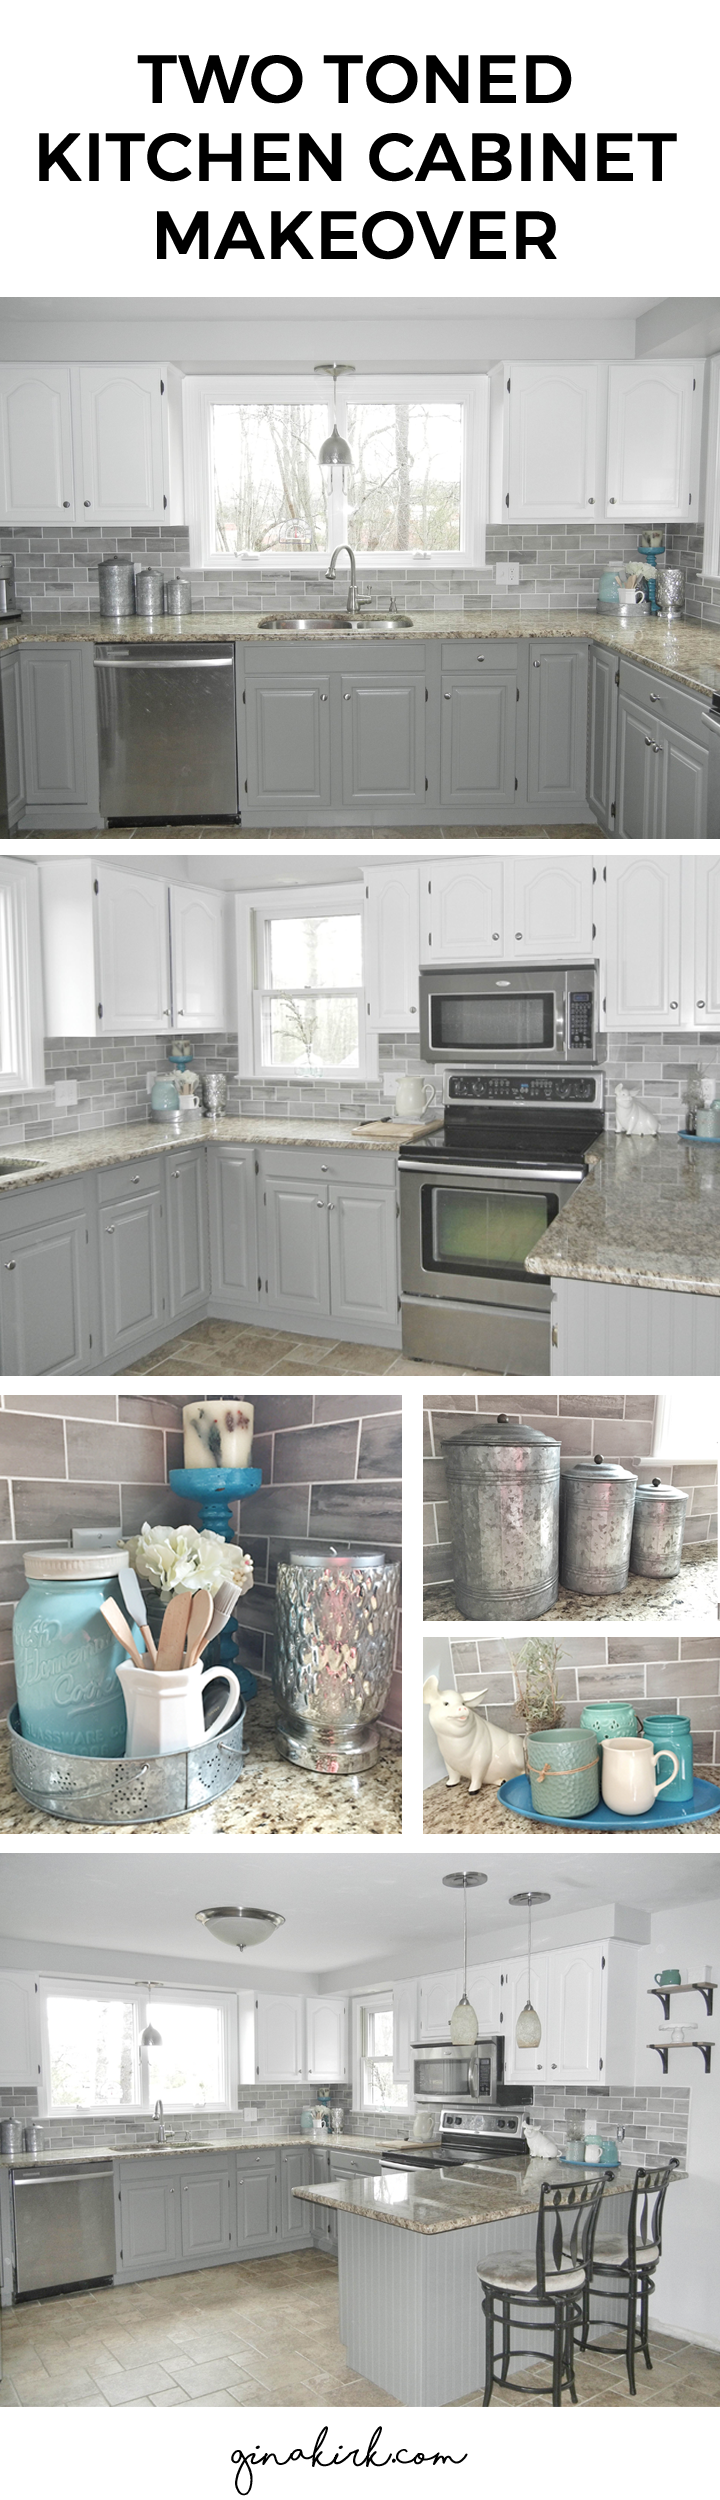
- Kitchen cabinets professionally painted
- Beadboard paneling
- New paint color on the walls
- New backsplash
- New pendant light (over the sink)
- All new outlets/switches and plate covers
Aside from the cabinet paint job, everything else was DIY (do it yourself) or, ourself. We decided to hire out for the cabinets because after reading too many Pinterest tutorials, we both agreed that I was totally nuts if I thought I could get this done in a reasonable amount of time (with three kids – one being a toddler).
Once they got started on the cabinets I was so glad, so glad, we hired out. It took them about a week, but the workload was intense. It probably would have taken us well over a month if we did it on our own. The painters used a sprayer, and lacquer as opposed to brush or roll on paint. I’m told this makes for a better look and is longer lasting. Apparently covering wood grain is difficult to do? (again, so glad I didn’t try to go nuts and do this on my own. Seriously, it was money well spent.)
A lot of people ask why we didn’t just replace the cabinets, and honestly, I couldn’t justify ripping out 20+ year old solid wood cabinets to replace them with pressboard cabinets. The quality is just not the same these days, and if you want higher quality cabinets, you better be prepared to spend over $5,000 (or even $10,000) for them. Insanity!
I know you are going to ask, so before I share the photos, we went with Dove White for the top and Chelsea Gray for the bottom (Benjamin Moore colors) The wall color we went with is Repose Gray by Sherwin Williams. I really wanted something nice and bright, I loved the two-tone cabinet look, and thought it was smart seeing that we have three boys. I knew I wanted teal/blue/green accent colors, but was a little nervous about the gray and brown coming together. There was no way we were changing the granite or tile, but honestly I could not be happier with our outcome! The kitchen of my dreams, is fiiiinally here.
Here are some big, bright and beautiful after photos…
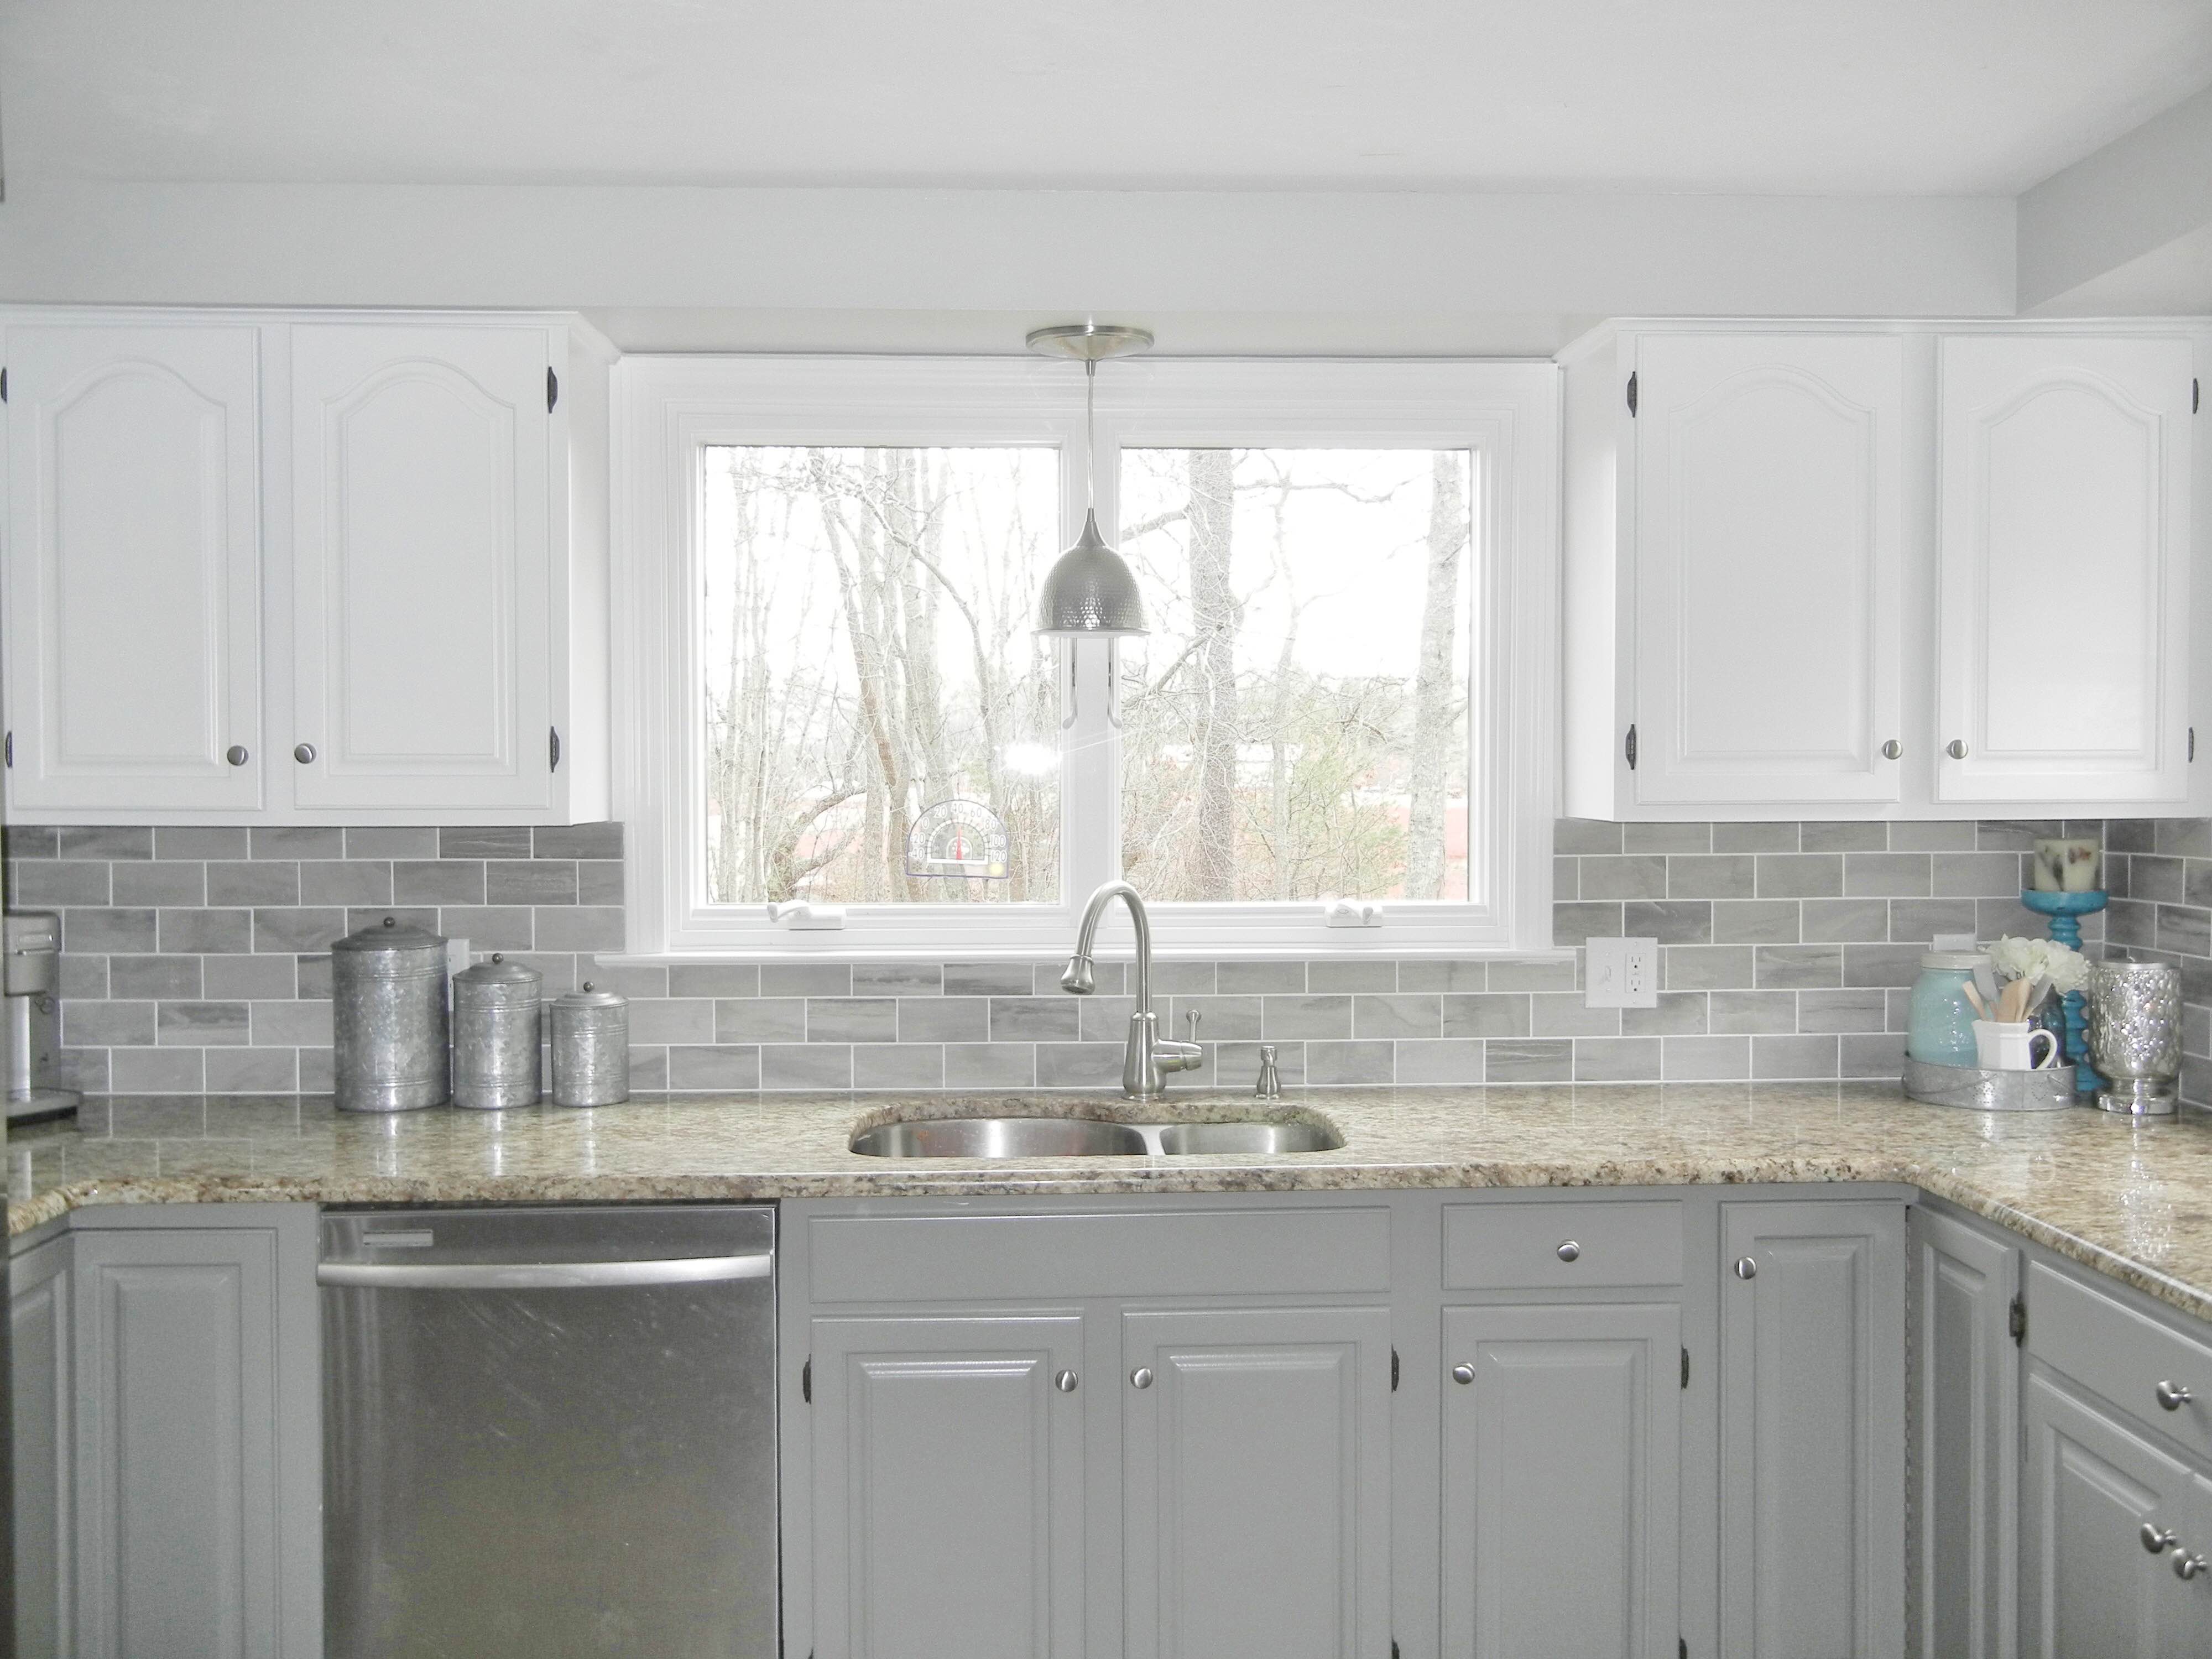
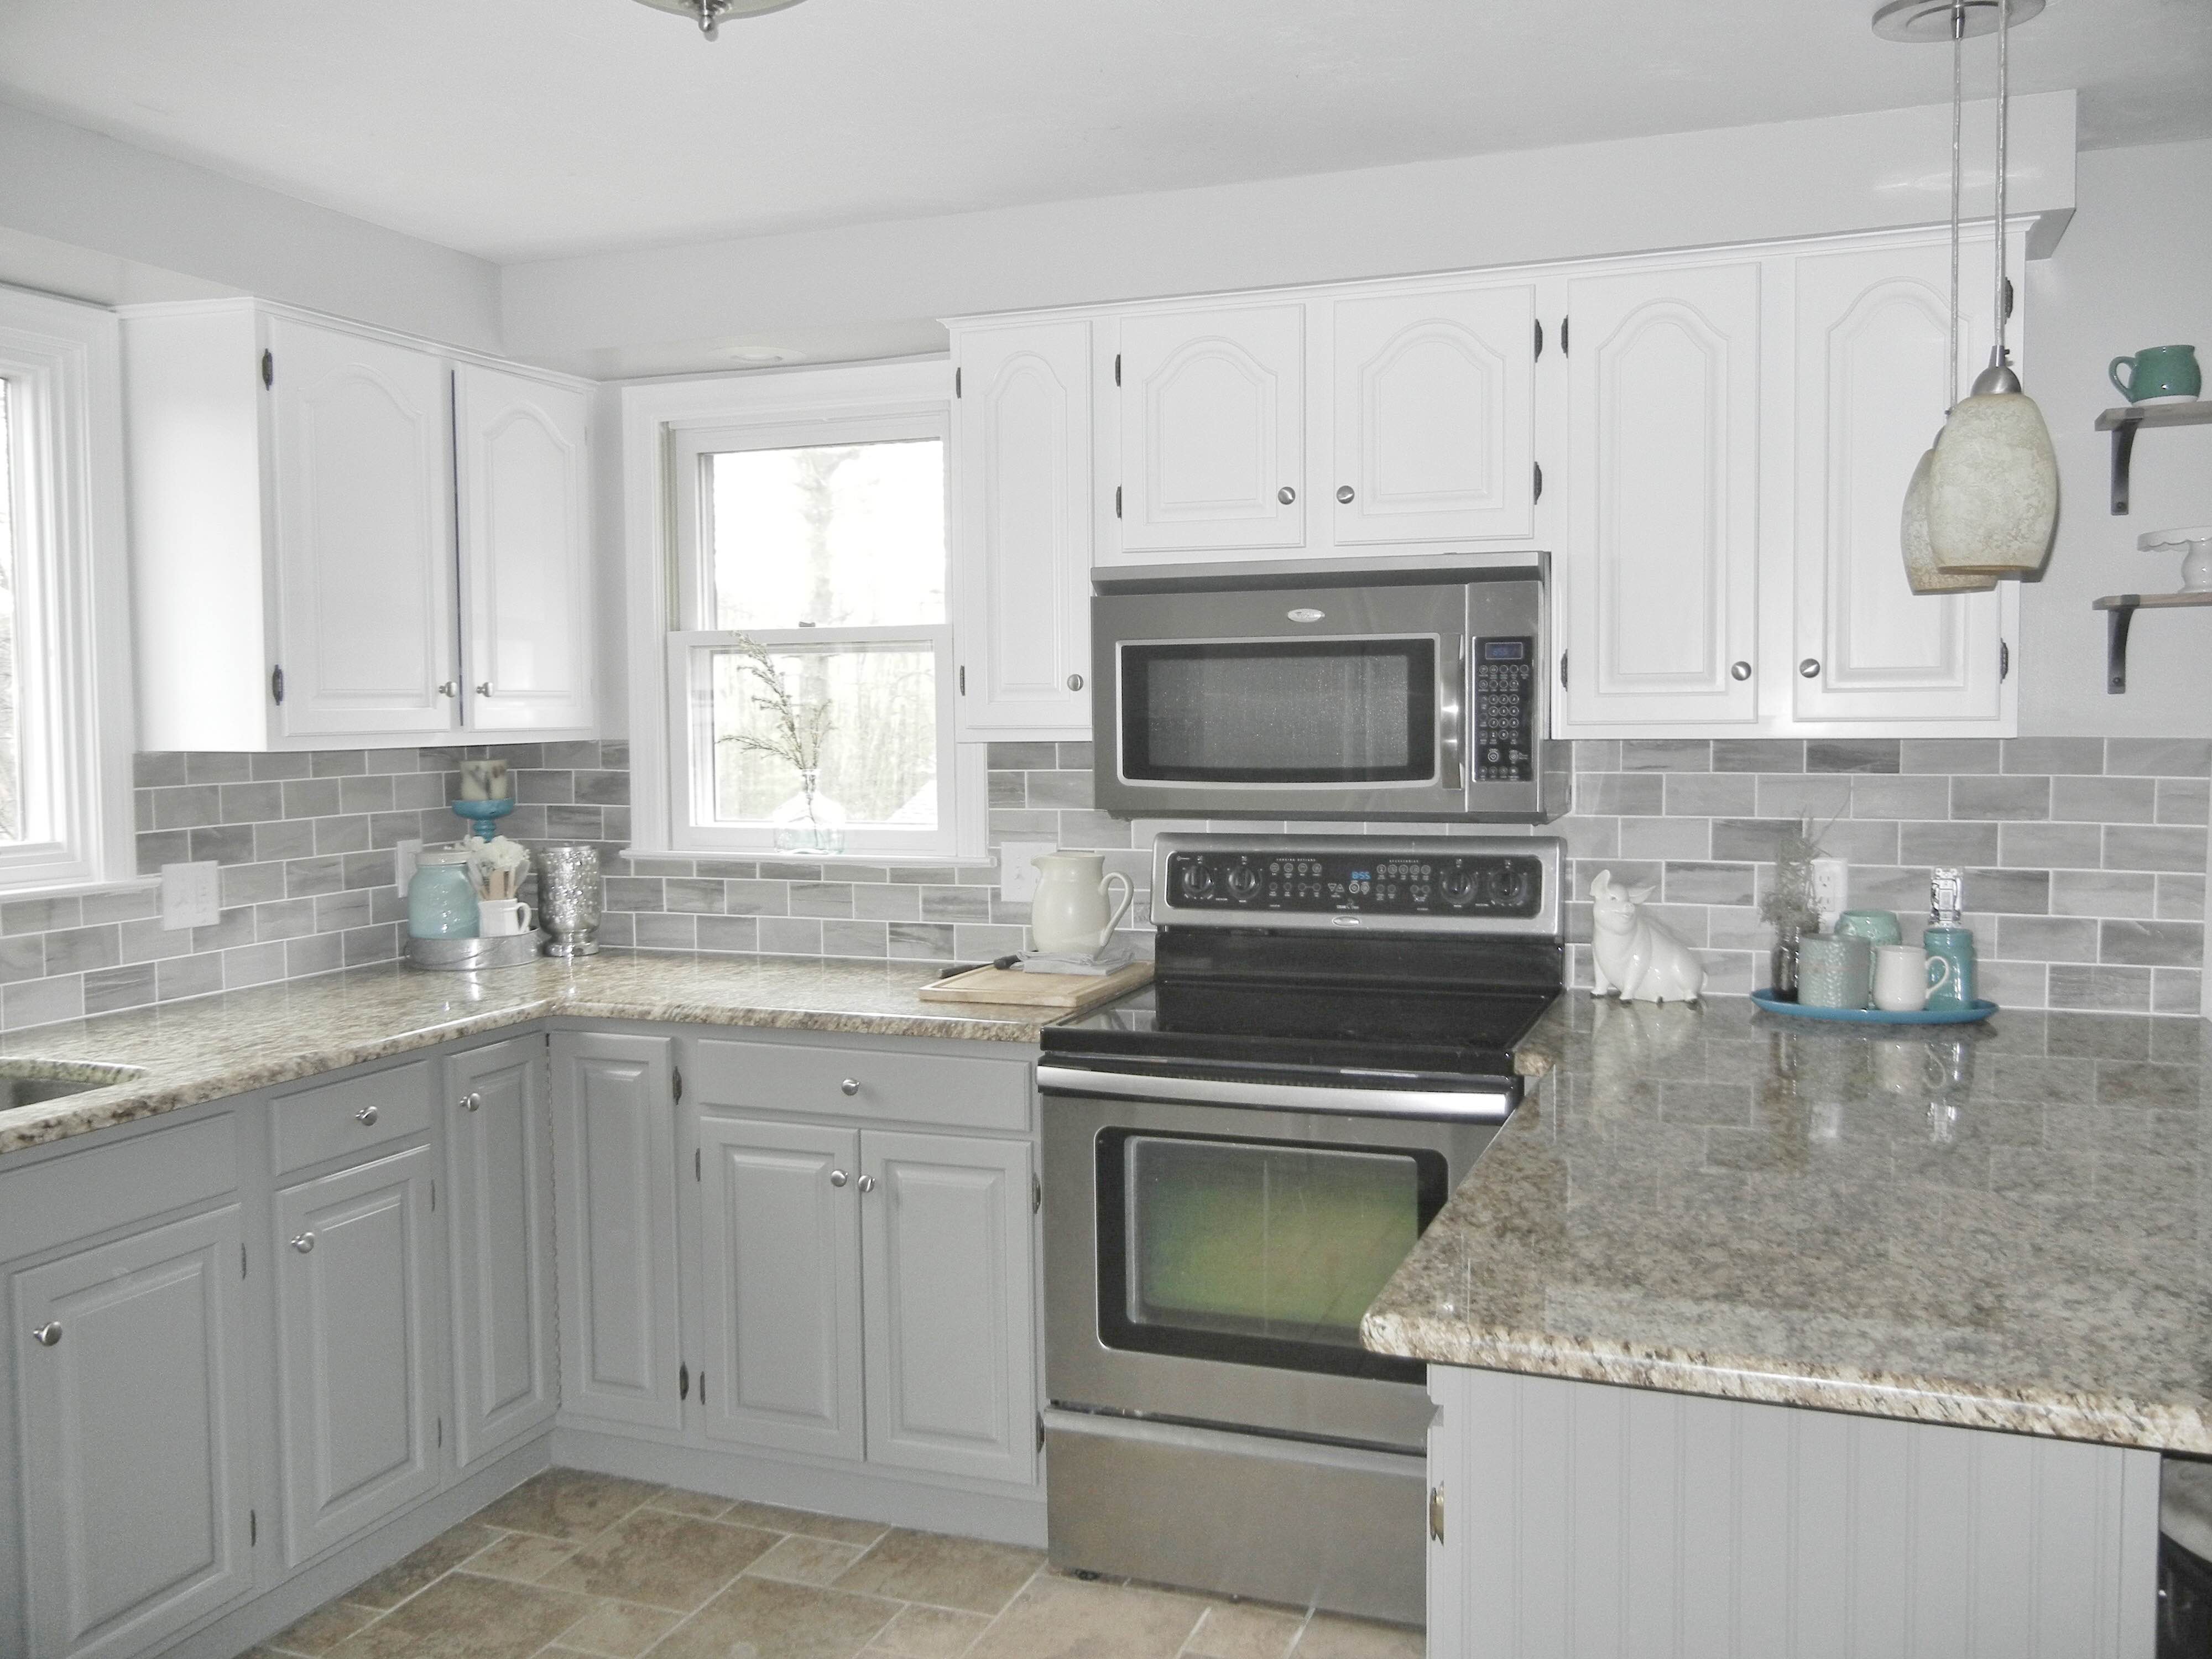
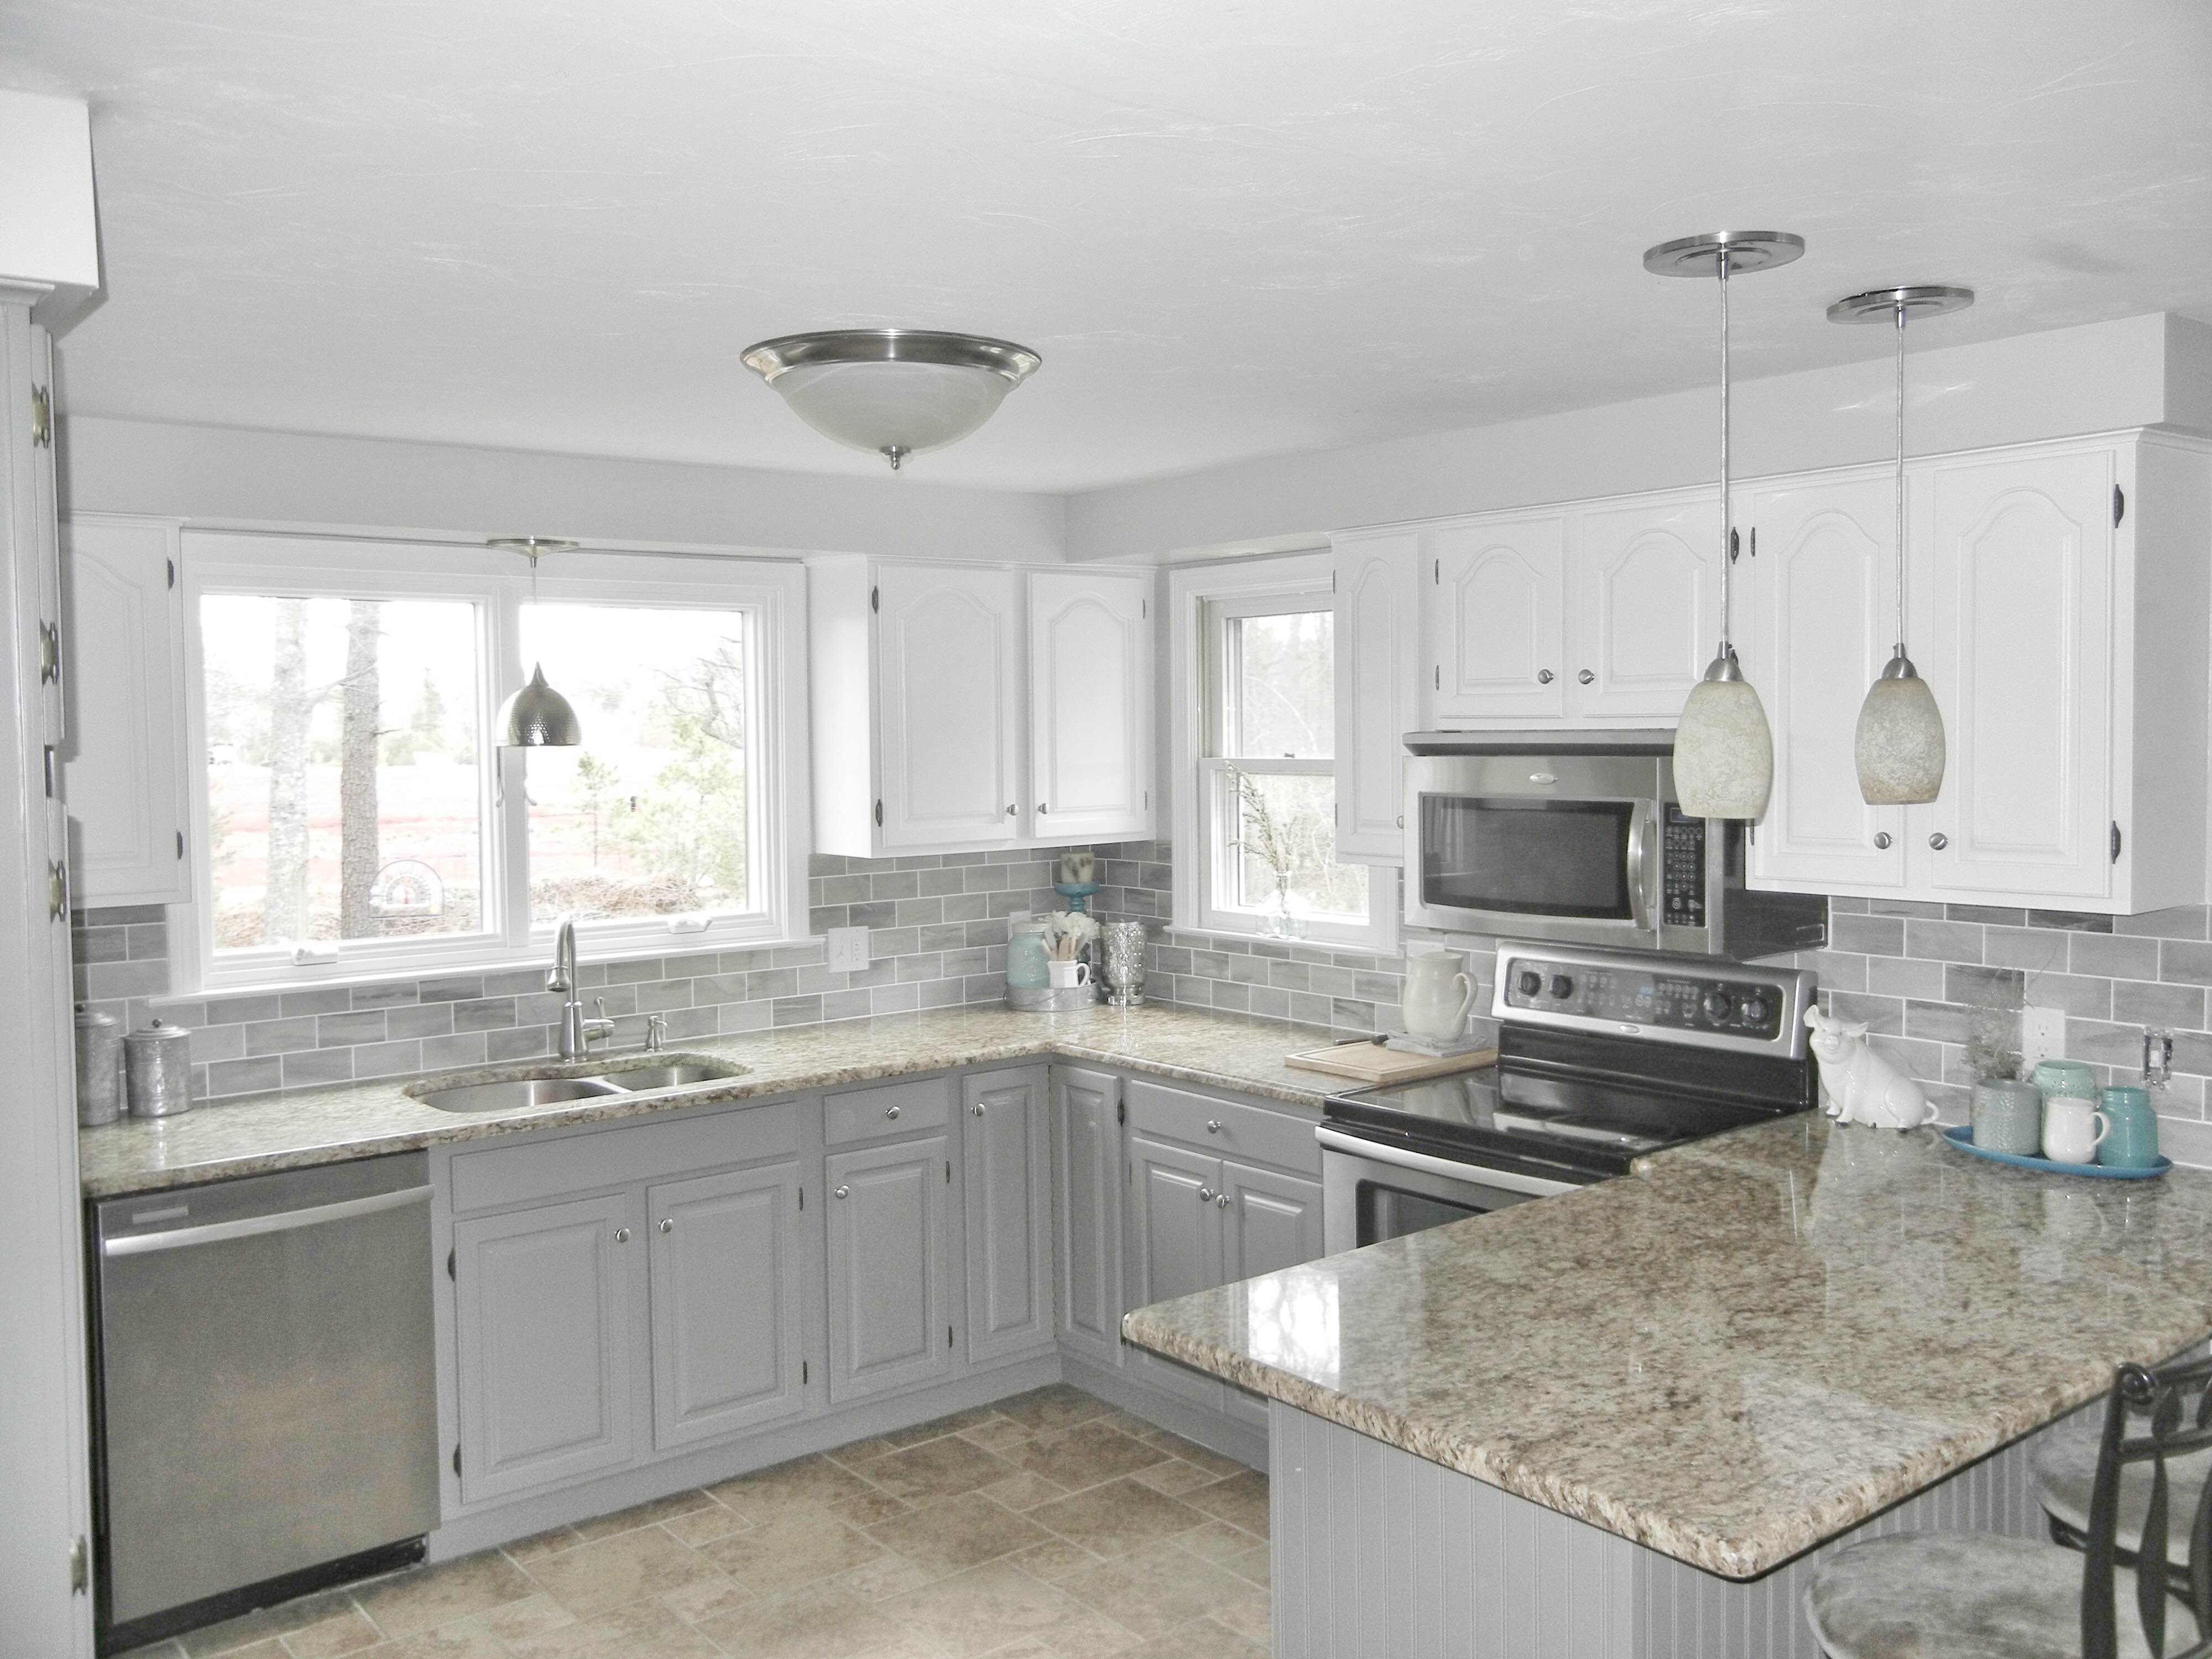
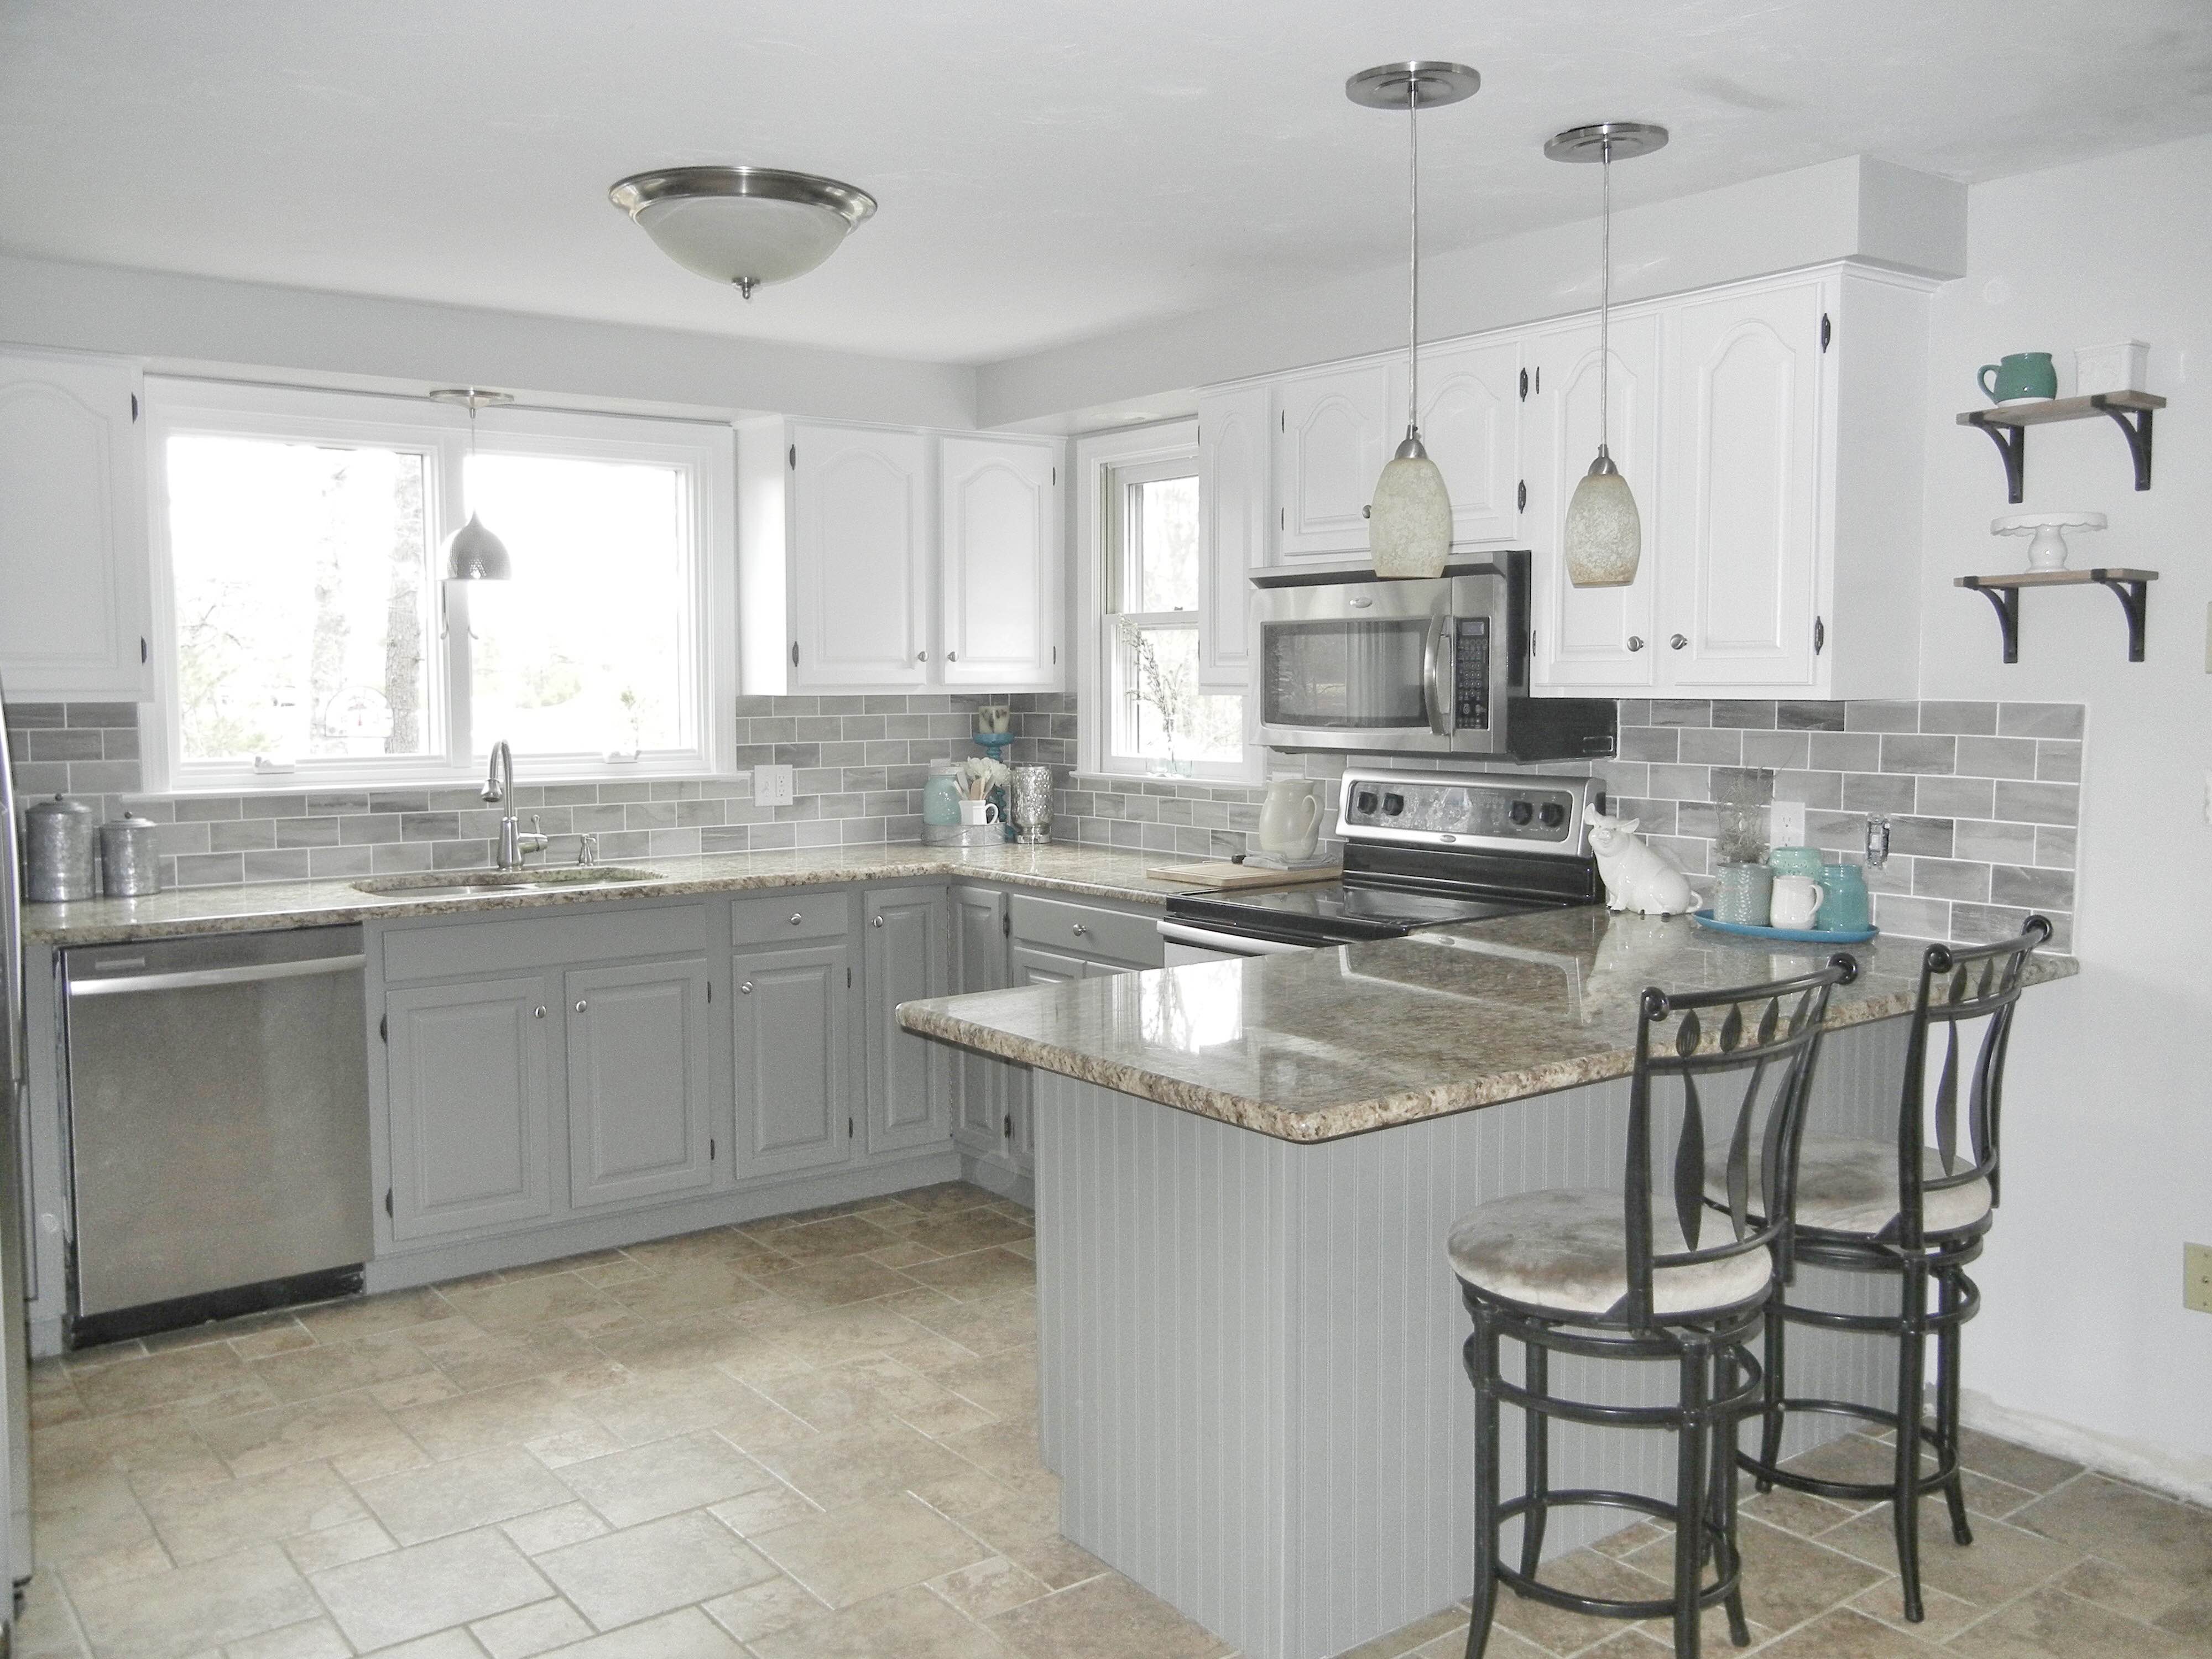
…and for your viewing pleasure:
Gorgeous right?
There are still a few minor things on my to-do list, I haven’t been able to find the right clear/amber glass shades for the pendant lights that are over the countertop seating area. Update: I found them! Pictures coming soon, here’s a preview. I’m going to use edison bulbs in them, I think it’ll really bring everything together! I also want to do a DIY reupholstery job on our bar stools – stay tuned for a tutorial there.
We also just finished up our faux reclaimed wood accent wall (tutorial here) and buffet table DIY makeover.. (tutorial here!) For more home decor, check out my fixer upper inspired spring favorites (here) and 15 under $50 galvanized Target finds (here).
We just carried the Fixer Upper Rustic Modern look into our family room – see our family room farmhouse facelift here!
Edit -Because so many of you have asked, the backsplash tile is called Ancient Gray – from Lowes! It was a subway tile, not a backsplash mat.
Here are a few of the pieces that are in my kitchen, because I know some of you will ask!
- Galvanized Kitchen Canisters (Amazon)
- Mason jar cookie jar (Amazon)
- Open shelving (Target)
- Pendant light over the sink (Lowes)
- Silver Candle holder (Clearance at Target, but here is a similar one, also at Target)
Everything else has come from Target here and there, or yard sales/antique shops (my mom is really great at finding me the perfect pieces, if you’re local visit her shop here!) I can’t wait to share the rest of this with you. Stay tuned for more – and you can hear about it as soon as I publish it if you subscribe to my weekly emails here.


78 Comments
Lauren
March 9, 2016 at 4:33 amThank you SO much for showing me that I CAN do gray and white with my Venetian gold granite. This looks great! So light and airy. I also hadn’t really thought of two cabinet colors, but I think it’ll be perfect since I’m also trying to blend in my black appliances with lighter cabinets. So many fun challenges…
Gina
March 10, 2016 at 2:41 amHi Lauren, you’re very welcome! I was a little worried at first too, but it came out so great! Good luck with your kitchen project! If you take any photos, share with me on Instagram! I’m @ginaekirk – I love before and afters 🙂
Molly
March 11, 2016 at 9:15 pmOh yes absolutely lovely, I love all the light. What a fabulous room
Mollyxxx
Gina
March 18, 2016 at 1:20 amThank you Molly!
Laura
May 14, 2018 at 12:34 pmGina, this is gorgeous!
How much did it cost to have them painted professionally?
Gina
June 14, 2018 at 2:53 pmHi Laura, it was under $2,000 🙂
Stacy
March 12, 2016 at 2:24 amBeautiful…I love it! I am dying to redo our kitchen…we have an old house and it still has 1960s harvest gold laminate counters-holy yuck. But we do have high quality solid wood cabinets, and I’m in full agreement…we’ll have them professionaly painted rather than rip them out. Great job on this reno!!!
Gina
March 18, 2016 at 1:21 amThank you so much! I hope I give you a little hope that it can be done 🙂
Jeri
March 12, 2016 at 8:43 pmSoooo your kitchen is killer! We just closed on our home YESTERDAY and I’m itching at the seam to update the kitchen into a modern farm look and I was skeptical too on the two toned cabinets, buuuut I love how yours turned out! Could you please tell me the color you chose for the walls?
Great team effort for you and the hubs even to your mom’s decor picks 🙂 love, love, love and thanks for sharing
Gina
March 18, 2016 at 1:19 amHi Jeri! Sorry for my slow reply here, congrats on the house! We went with Repose Gray on the walls (by Sherwin Williams) I’m going to update the post now 🙂 Thanks so much for the love, I basically live in the kitchen now, haha!
Wayne Peacock
December 13, 2017 at 3:22 amGina,
Are the bottom cabinets repose gray also? I’m about to do the same in our kitchen and am trying grays now.
Thanks!
Wayne Peacock
December 13, 2017 at 3:26 amJust saw that you used Chelsea Gray 🙂
Allanah
March 15, 2016 at 6:09 pmCan you give more details on your backsplash tiles? I am doing a very similar kitchen redo and I love the backsplash tiles! I know you said Ancient Gray…but what brand? Thanks!
Gina
March 18, 2016 at 1:14 amHi Allanah! I actually didn’t save the box! We got it at Lowes in the regular wall tile section, it wasn’t a backsplash pad. The SKU # is 8020841242645 and the sticker says ancient gray, made in Italy on the back. Hope that helps!
Stylish Two Tone Kitchen Cabinets for Your Inspiration - Hative
March 18, 2016 at 5:48 am[…] via isshereally […]
Kim Novak
March 20, 2016 at 1:43 pmGreat job! You inspired me to do my cabinets. Can you tell me the color of your glass backsplash.
Kim
Gina
April 2, 2016 at 12:13 pmHi Kim! It’s actually a subway tile! It’s from Lowes, it’s a gray/white mix that we got in the kitchen tile section 🙂
Heidi
March 20, 2016 at 9:36 pmIt all looks so beautiful!! I love the backsplash with that color granite. Do you remember what color the granite is?
Gina
April 2, 2016 at 12:14 pmHi Heidi! It’s called Giallo Ornamental 🙂 and thank you very much!
Renata
March 27, 2016 at 1:17 pmHello, my kitchen is roughly same size. What was the cost of having the cabinets sprayed, and did you have to take any of them down? Just getting ideas before we tackle our 70’s kitchen.
Gina
April 2, 2016 at 12:10 pmHi Renata! We didn’t replace or remove any of the cabinets, the cost was $1800 for the painting. It was quite the process and well worth the money after watching how much time and effort was dedicated to it! Good luck with your kitchen 🙂
Gina Britton
May 6, 2016 at 3:58 pmMy neighbor had their cabinets professionally painted and the texture seems off in my opinion. They dont seem as smooth and they originally did. Do you find the same with yours or do they look like they were always that color? Ive wanted to do this also but before we moved it the previous owners had these installed and they are gorgeous but just to ORANGE for me.
Gina
May 10, 2016 at 2:05 amHi Gina! The painters used a wood filler to remove the wood grain for that exact reason. Apparently oak will just suck in the paint or lacquer unless you fill the grain!
Kathleen
May 23, 2016 at 9:56 pmWe are closing on a house soon. Large kitchen with lots of 80’s oak cabinet. My dream kitchen is to have it white also. Great inspiration and I think I will have it professionally done too considering the amount of cabinets I have. Your post reassured me in that decision. Thank uou
Mikki
March 30, 2016 at 8:20 pmAfter reading your Spring Fixer Upper Inspired post I clicked on the link to your kitchen reno. What a great job! It looks beautiful!
We are getting ready to start on ours. We are having a friend that is a contractor help us with this one because our house is over 100 years old and we have some supporting walls to deal with and such. I can’t wait to get started.
Love the color choices!
Gina
April 2, 2016 at 12:08 pmThanks Mikki! That’s so exciting! It’s so nice to have professional help, I’m glad we chose to hire someone to do the painting – just watching the whole process made me tired haha. Good luck and have fun with it!
Brittani
April 2, 2016 at 6:34 amAbsolutely gorgeous! My fiance and I are buying our first house and the kitchen is horrendous. Considering I’m working on becoming a baker the kitchen is important to me, haha. Could you give me some details on the painting of the cabinets?
Gina
April 2, 2016 at 12:06 pmHi Brittani, congrats! The process was 1. Remove all the doors and hardware and sand everything 2. Prime with Stix primer 3. 2 coats of lacquer. They actually used a paint sprayer instead of brushing it on because it makes the lacquer stick better and gives a better finish. I hope that helps!
How To Create Space in a Small Property - AHRN.com - The #1 Trusted Housing Resource
April 4, 2016 at 1:01 pm[…] paper towel holders, etc. Here’s an example of how profound those simple changes can be from IsSheReally.com!Be sure the inside as well as the outside of the stove/oven, fridge, dishwasher and microwave are […]
Emily
April 4, 2016 at 1:13 pmI love the new look. It’s gorgeous!! I especially love the back splash. 🙂
Gina
April 9, 2016 at 2:10 pmThank you!
Cheri
April 4, 2016 at 7:08 pmThis is gorgeous!!! I’m in the middle of a kitchen reno and getting ready to paint my own cabinets. I have a good friend who painted cabinets professionally for 18 years and she is going to give me some tips…otherwise I’m not sure I would attempt to do it myself. I love the two tone cabinets! I’m trying to decide whether or not to tackle the backsplash on my own. I’m planning to use subway tile. Do you have a tutorial on how you did yours?
Gina
April 12, 2016 at 2:27 amHi Cheri! Sorry I missed your comment here. I hope all is going well with your renovations. I don’t have a tutorial, but it was pretty simple. My husband is the tile man in the house haha. We followed the basic subway tile pattern and it went pretty quick!
Lori McCluskey
April 8, 2016 at 2:11 pmIts beautiful and so glad to see grey and white as that is the combination I want to do on my ’80’s cabinets. However, my refrig is a cream color, would it look awful with pure white cabinets?
Gina
April 12, 2016 at 2:28 amHi Lori, I say go for it, you could always paint your fridge or just leave it until you have the funds to replace it! The white brightens things up so well 🙂
Mariah
April 8, 2016 at 11:51 pmHello! Beautiful kitchen! I want those subway tiles!!! I’ve been to lowes, but they don’t seem to carry them anymore. Do you mind me asking when you purchased them?
Thank you!
Gina
April 12, 2016 at 2:29 amHi Mariah! We did get them at Lowes, I think I posted the name here in the blog. They were in the regular tile section, not a backsplash mat in the kitchen section. Hope that helps!
Laurie Wisecup
April 10, 2016 at 12:38 pmI am curious how you painted your windows. Ate they wood or vinyl?
Gina
April 12, 2016 at 2:24 amHi Laurie! They were wood, pine actually. They sanded them, then used one coat of STIX primer, and two coats of lacquer. I’m using the same method throughout the house now to transform the rest of the baseboard and trim to white, but I’m using regular semigloss paint over the STIX primer. Hope that helps!
Bonnie
April 11, 2016 at 12:46 amLove the kitchen redo did you keep the original hinges?
Gina
April 12, 2016 at 2:22 amHi Bonnie, thank you! Yes we did keep the original hinges 🙂
Bonnie
April 12, 2016 at 10:55 amThanks for the response we are moving into a home with white cabinets and wrought iron hinges and pulls wanted to make the space more modern but there would be a lot of hinges to replace glad to know you kept yours in your beautiful kitchen makeover hope you don’t mind but I’m copying some of your design…….
Carly
April 15, 2016 at 5:51 amAre these the tiles you used for the backsplash?
http://www.lowes.com/pd_526261-34692-07EG15_0__?productId=50122023 (hope that link works!)
It says they are no longer available on lowes.com 🙁 I fell in love with your backsplash and wanted to price it out. But it’s probably better I can’t get them because I just bought tiles to do my backsplash today and my husband will kill me if I change my mind….. again. Lol Love your kitchen! We are slowly redoing ours also.
Gina
April 17, 2016 at 12:30 amHi Carly, YES! I don’t think the box said Del Conca, but it looks almost exact and the name on the actual tile tag was Ancient Gray. Bummer that it’s out of stock though!
Nicole
April 20, 2016 at 3:19 amI noticed you painted the window frame. Is the rest of the trim in your house oak? Did you paint that or leave it? I want to paint my cabinets by I also have oak trim!
Gina
April 27, 2016 at 11:00 pmHi Nicole! We painted the two windows that were between the cabinets but that was it to start. Honestly it looks great that way and creates a sort of separation for the kitchen which was nice. I really love the look of white but it’s a huge feat, so we decided to do a little at a time on the first floor for now. We just completed our family room facelift (here) and decided that since we were painting the walls we might as well do the trim! It actually isn’t bad if you just do a bit at a time 🙂 Hope that helps!
Amanda
May 8, 2016 at 7:38 pmAbsolutely beautiful! Love the two-toned look! I’m so happy that you added in the detail about the professional painters taking a week to complete the paint job on the cabinets! I was considering tackling my cabinet paint project myself, but now it seems worth it to hire out. Do you mind me asking how much the professional painters charged for the work? My kitchen is about the same size as yours, so I figure it might be a sumilar estimate!
Gina
May 10, 2016 at 2:02 amHey Amanda! It was SO well worth hiring them. The total price was $1800 for the cabinets, and he said we have a pretty standard size kitchen, so hopefully it’ll be around the same for you!
Cecilia Gonzalez
May 15, 2016 at 12:08 amHi Gina
I really like you kitchen makeover especially the color of your oak cabinets.
Do you have the contact for the painter? I have the same kitchen cabinets and I’d like to paint it..
Thank you
Cecilia
Gina
July 27, 2016 at 2:39 amHi Cecilia! I’m sorry I missed your comment. We used a small local company called New England Paint + Pressurewashers. If you’re local to MA I am happy to get you their contact info if you’d like! 🙂
Kim
May 15, 2016 at 12:29 amI am planning on painting my cabinets the same two colours you picked! It looks great.
Gina
May 18, 2016 at 12:38 pmThanks Kim!!
Linda
May 16, 2016 at 5:20 pmHi Gina,
I love what you did with your kitchen! I’ve been racking my brain over and over again with should I get new cabinet doors or have everything painted. After I saw your kitchen I finally decided to get them painted. Yours look beautiful, and I liked the fact that they filled in the wood grain to make them smoother. However, I didn’t notice who you used to paint yours? I apologize if you did mention it already on your pin it, I just couldn’t find it.
Thanks,
Gina
July 27, 2016 at 2:38 amHi Linda! My apologies for missing your comment – I had a few that didn’t appear right away. We used a small local company called New England Painters + Pressurewashers. If you’re local to MA I can get you their contact info!
11 White Kitchen Remodeling Ideas Using White Cabinets
May 21, 2016 at 2:11 pm[…] Gina Kirk, the blogger behind Is She Really, described her kitchen when she first moved into her home in 2008 as “Major 80’s “. […]
Joanne
June 6, 2016 at 3:41 amBeautiful! I’m going to do the same to our kitchen. Did the painters paint the inside of the cabinets too?
Gina
July 27, 2016 at 2:37 amHi Joanne! No they only painted the front of the shelves, the inside of the cabinets are still oak, but it’s much lighter and not as warm as the original cabinet colors so I’m okay with it 🙂
Mariah
June 18, 2016 at 11:43 pmI found the tiles (they ARE still available at Lowes). I’m wondering what color grout you used? White or light grey? I like the light color between the tiles. 🙂
Mariah
June 25, 2016 at 6:22 pmI recommend Cialis as a drug for family people, when you can take a pill at home for a few days, or half. The effect comes only after 5-8 hours. Therefore, it is inconvenient to use it for random relationships. Luckily Cialis is sold at a low price online on https://cialnow.com/.
Kathy
June 29, 2016 at 1:41 pmWow! You (and your paint guys) did a fantastic job on the kitchen!! It is hard to believe it’s the same space, looks twice as big now. Love it!
Gina
July 27, 2016 at 2:33 amThank you Kathy! I’m still getting used to how big it feels – what a difference paint can make 🙂
Sue
July 1, 2016 at 3:01 pmLovely Kitchen…All the colors are beautiful!
My question is what the name of ( previous) lighting fixtures over the bar before you found new ones. They both gorgeous! You’ve inspired us to paint our 20 plus years oak cabinets and hope we can do it! Wish us luck! : )
Gina
July 27, 2016 at 2:33 amHi Sue! Thank you so much, they were pendant lights from Lowes – if you visit the lighting aisle they have a whole section dedicated to pendant lamps and shades (which are interchangeable). I don’t have the name of the shade but they are a tan/beige color. Good luck and have fun!
Laura
July 11, 2016 at 8:00 pmGina, you kitchen makeover is amazing. Like you I bought our home in 2008 and boy it’s country oak galore. Love the two tone I am going for the same look. You did an amazing job and I just love your Blog. 🙂
Gina
July 26, 2016 at 2:08 pmThank you Laura! The oak is crazy isn’t it? Good luck with your kitchen!!
Judy
July 24, 2016 at 3:57 pmLove your kitchen. Beautiful. I have granite countertops with brown, black, and gray in them. Beige, white, and light brown back splash. I think your countertops have some gold in them. How do you think your paint choices will go with my countertops? I am wanting in incorporate grey cabinets and walls into my kitchen.
Gina
July 26, 2016 at 2:01 pmHi Judy! The wall and cabinet colors brought out the gray in my countertops which was great! I was unsure how it would look at first, because the countertop has a lot of beige/gold but the gray really pulled everything together nicely. Good luck with yours!
Darlene
July 26, 2016 at 10:54 pmWhat are the paint colors for both upper and lower cabinets? I absolutely love them and am starting my kitchen renovation!
Gina
July 27, 2016 at 2:30 amThanks Darlene! They are Benjamin Moore Chelsea Gray and Dove White 🙂
Lauren
August 6, 2016 at 3:40 amI normally HATE the kitchens I see with different colored uppers and lowers, but I absolutely love your kitchen. I am in the middle of a remodel, and we are doing while cabinets, with grey island. I’m hoping it will look good when we are finished. Looks great so far:) Thanks for sharing your project!
Gina
August 8, 2016 at 10:48 pmThank you so much Lauren! Good luck with yours!
Shellsea
August 8, 2016 at 5:16 amThose grey cabinets are perfect?! What’s that color called
Gina
August 31, 2016 at 2:37 amThank you Shellsea! We use Chelsea Gray by Benjamin Moore.
Elizabeth
August 31, 2016 at 12:10 amHi Gina, love the make over! We are just starting our kitchen and when searching for Chelsea Gary, I found that Benjamin Moore and Sherwin-Williams both have that color. I just wanted to confirm you used the Benjamin Moore version. I was surprised at how dark the BM swatch was in comparison to your photos so just wanted to double check. Thanks! 🙂
Gina
August 31, 2016 at 2:34 amHi Elizabeth! Yes it’s Benjamin Moore – we used the lacquer not the paint so I’m not sure if the color shows up a bit lighter with the lacquer because it’s shiny? Our cabinets appear a bit lighter in these photos because of the time of day I took them it was SO sunny in the kitchen, but I don’t think you will be disappointed with the color, we love it! Good luck!
Debbue
June 5, 2018 at 11:17 amI love your kitchen- I am painting my cupboards the same color as yours but was wondering what did you do to the hinges . Did you leave them or did you paint them? My hinges are on the outside of the door just like yours . My knobs will be satin nickel and the color of the hinges looks just like your color before painting. Any suggestions would be appreciated
Gina
June 14, 2018 at 2:47 pmHi Debbie! I didn’t paint the hinges, they were a dark color before and we just left them as they were 🙂 Good luck with the kitchen!
Ginger
March 12, 2019 at 3:34 pmgotta love those wallpaper borders 😉